Beware guys, this is going to be again a long but detailed tutorial and it is based upon vps.. I will show you how to obtain
a free vps and make it configurable as a http proxy.
You need -
1) One VPS
2) Bitvise SSH tunnelier
As according to the new DC solution , all of u have to do is use www apn and use http proxy. Now , u have to search HMA for that proxy and alas, that proxy dies wiithin
a few days. So no more tension .. Create ur private proxy and use only urself.. And guys having powerful vps es, please share ur private proxies here to
help our frendz.
SO, coming to tut, u must hav a vps to make this work.
Now, to get a vps , Go to this link and register here,
link is hidden. for link, pm me AND mind it, DONT post here pm me... And I will not give evryone link. Mind iT :m :m
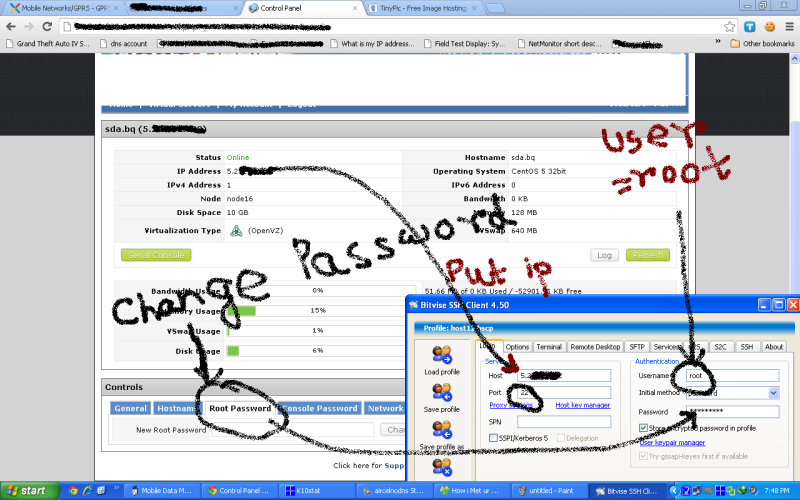
Within 2 weeks, ur vps will be approved. Now change OS to centos 5 and change root password ..
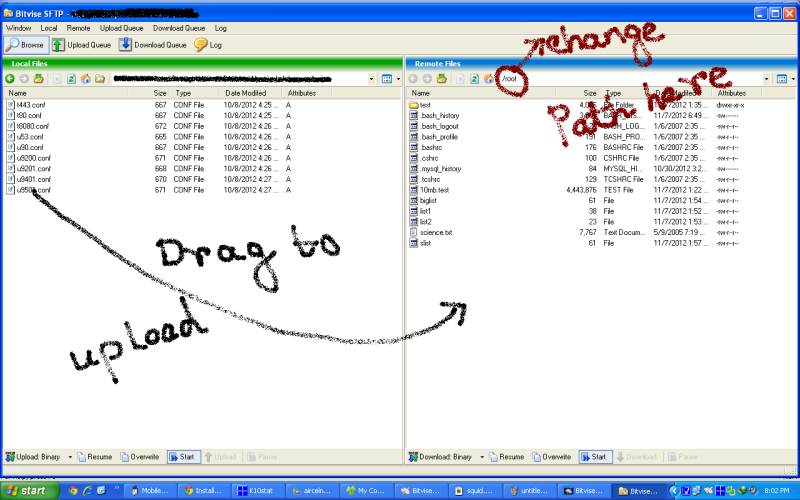
Here are some ss to help u how to change ur root password, what to put in bitvise tunnelier and how to upload files in tunnelier.


Now come to the procedure..
1. Login into ur terminal and write these commands one by one . As forum scripts dont allow double quotes, i am uploading the txt file . U just copy each line and paste in the terminal and run it...
http://www.datafilehost.com/download-70b68d9e.html
2. Now download
http://www.datafilehost.com/download-7e81f7f0.html
...
.
REMEMBER to modify these two lines in this file .
Quote
acl ip1 myip **.**.**.**
tcp_outgoing_addres s **.**.**.** ip1
.
replace **.**.**.** by your vps ip..
after that, refer to the 2nd SS, go to /etc/squid/ and upload this file in that folder, overwrite it..
3. Now write these two commands successively .
Quote
chkconfig --level 2345 squid on
/etc/init.d/squid restart
VOILA!! your own private proxy is ready and use this ip in ur vpn config...
REMEMBER , UR PROXY WILL BE
**.**.**.**:3128 (ofcourse **.**.**.** is ur vps ip)
Click on the share button now to appreciate our effort


Comments